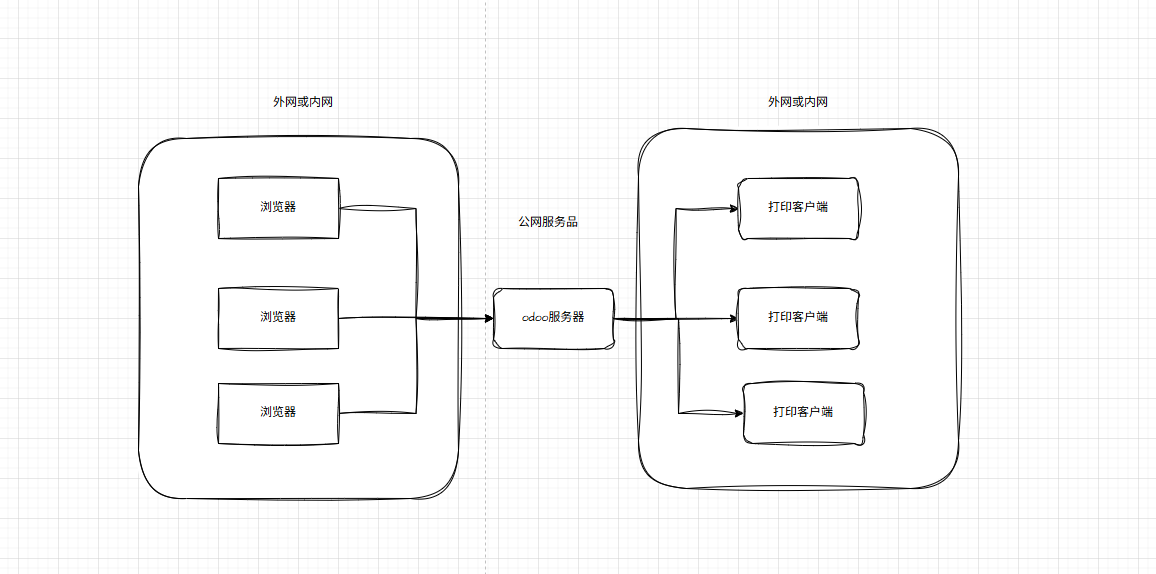
ODOO生产中,用户打印的逻辑是先下载,再打印,操作起来肯定是很繁琐,较好的方式是直接打印,但直接打印又有两种情况,一种是弹出浏览器的对话框,一种是配置好,点击时就直接到打印机。显然,直接打印到打印机是最好的方案。方案加构图如下:
具本实现呢,目前市面上也有两种方案
1、使用printernode一类的第三方服务,如app市场上的模块,这个方式的好处是成熟稳定,坏处是,如果用得多,你还得交个流量费。自己用没啥,给客户用就有点尴尬。
此种方案依赖于第三方服务,所以存在第三方服务费用,也是情理中,只是app市场上调用一个第三方的应用来做这个事总感觉有点奇怪,只能说在没有选择的情况下是个很好的选择。
2、自行实现中转服务。架构图如下
客户端效果:
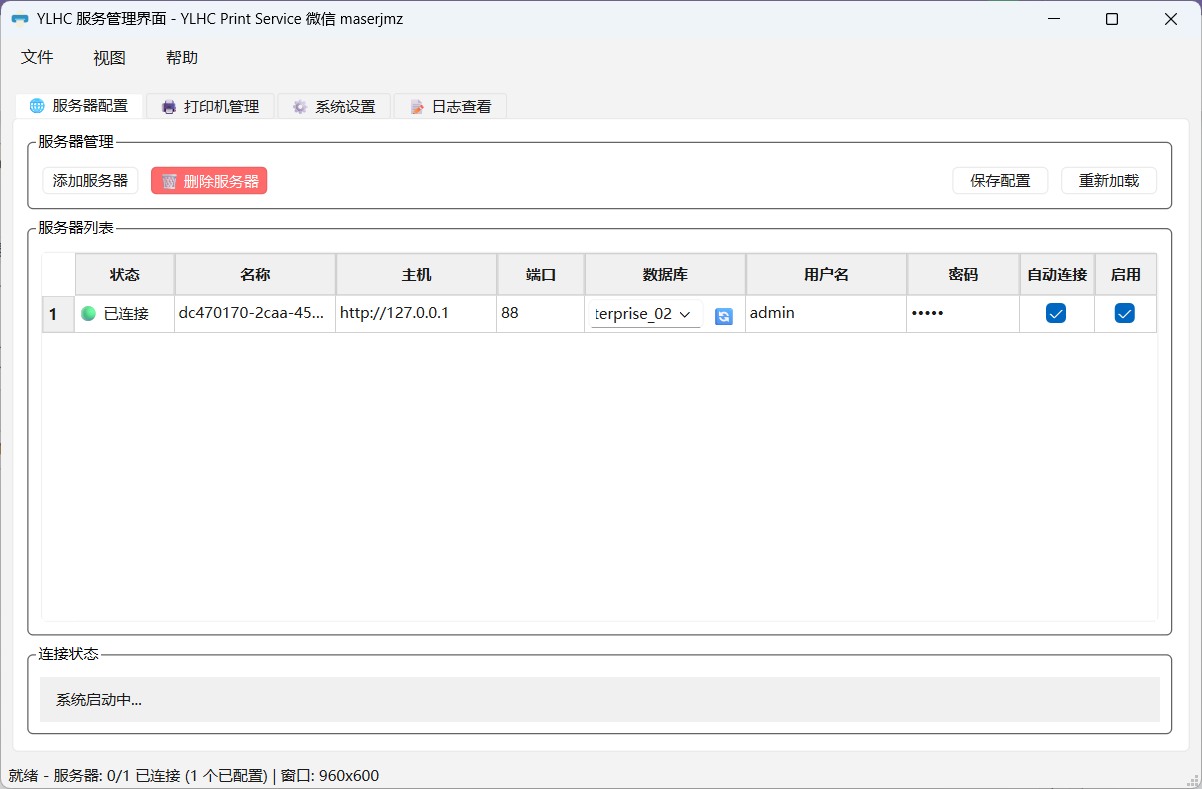
注意,这里如果是http使用的是80端口,如是https则使用的是443端口,同时,如果通过nginx代理,则nginx里边配置/websocket的转发
upstream erpserver {
server 127.0.0.1:8000;
}
upstream erpserver_longpolling {
server 127.0.0.1:8003;
}
upstream erpserver_websocket {
server 127.0.0.1:8000;
}
server {
listen 80;
server_name www.xxxx.com;
return 301 https://www.xxx.com$request_uri;
}
server {
listen 443 ssl;
server_name www.xxxx.com;
access_log /var/log/nginx/ylhc_access.log;
error_log /var/log/nginx/ylhc_error.log;
# Client settings for better performance
client_max_body_size 200m;
client_body_timeout 60s;
client_header_timeout 60s;
keepalive_timeout 65s;
send_timeout 60s;
# SSL
ssl_certificate /etc/letsencrypt/live/www.xxxx.com/fullchain.pem;
ssl_certificate_key /etc/letsencrypt/live/www.xxxx.com/privkey.pem;
ssl_trusted_certificate /etc/letsencrypt/live/www.xxxxx.com/chain.pem;
# Proxy settings
proxy_read_timeout 720s;
proxy_connect_timeout 720s;
proxy_send_timeout 720s;
proxy_set_header X-Forwarded-Host $host;
proxy_set_header X-Forwarded-For $proxy_add_x_forwarded_for;
proxy_set_header X-Forwarded-Proto $scheme;
proxy_set_header X-Real-IP $remote_addr;
# Keep-alive settings for long connections
proxy_http_version 1.1;
proxy_set_header Connection "";
proxy_buffering off;
proxy_request_buffering off;
# Request for root domain
location / {
proxy_redirect off;
proxy_pass http://erpserver;
}
# WebSocket support for longpolling (WSS over HTTPS)
location /longpolling {
proxy_pass http://erpserver_longpolling;
proxy_http_version 1.1;
proxy_set_header Upgrade $http_upgrade;
proxy_set_header Connection "upgrade";
proxy_set_header Host $host;
proxy_set_header X-Forwarded-Host $host;
proxy_set_header X-Forwarded-For $proxy_add_x_forwarded_for;
proxy_set_header X-Forwarded-Proto $scheme;
proxy_set_header X-Real-IP $remote_addr;
proxy_cache_bypass $http_upgrade;
proxy_read_timeout 3600s;
proxy_send_timeout 3600s;
proxy_connect_timeout 3600s;
# WebSocket specific optimizations
proxy_buffering off;
proxy_request_buffering off;
}
# WebSocket support for /websocket endpoint (WSS over HTTPS)
location /websocket {
proxy_pass http://erpserver_websocket;
proxy_http_version 1.1;
proxy_set_header Upgrade $http_upgrade;
proxy_set_header Connection "upgrade";
proxy_set_header Host $host;
proxy_set_header X-Forwarded-Host $host;
proxy_set_header X-Forwarded-For $proxy_add_x_forwarded_for;
proxy_set_header X-Forwarded-Proto $scheme;
proxy_set_header X-Real-IP $remote_addr;
proxy_cache_bypass $http_upgrade;
proxy_read_timeout 3600s;
proxy_send_timeout 3600s;
proxy_connect_timeout 3600s;
# WebSocket specific optimizations
proxy_buffering off;
proxy_request_buffering off;
}
# Cache static files
location ~* /web/static/ {
proxy_cache_valid 200 90m;
proxy_buffering on;
expires 864000;
proxy_pass http://erpserver;
}
# Gzip Compression
gzip_types text/css text/less text/plain text/xml application/xml application/json application/javascript;
gzip on;
}
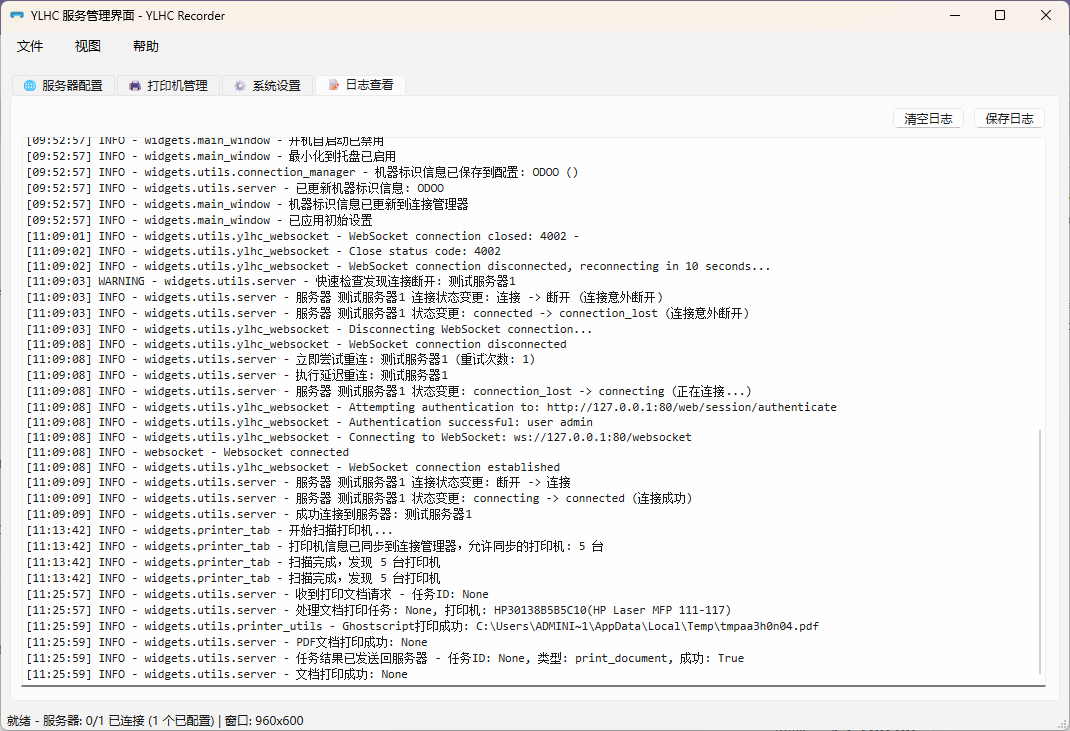
客户端连上以后,会自动同步本地打印机信息到服务器,服务端效果如下
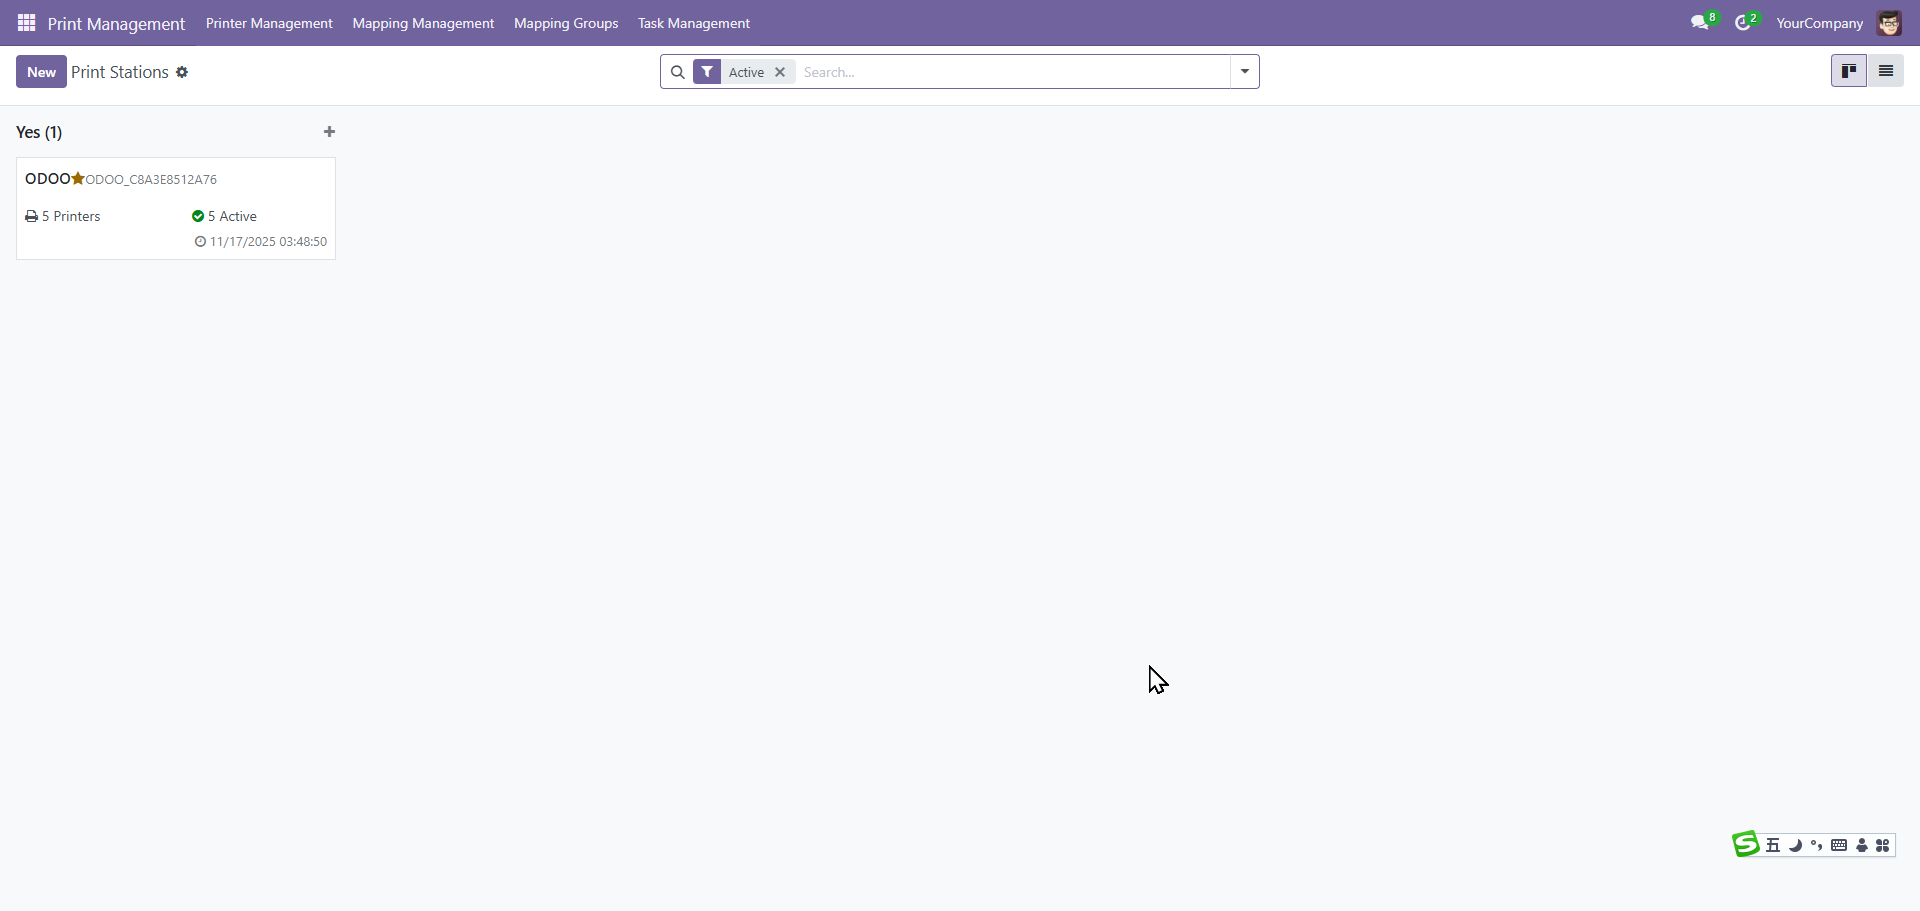
在后端需要配置报表和打印机的映射关系
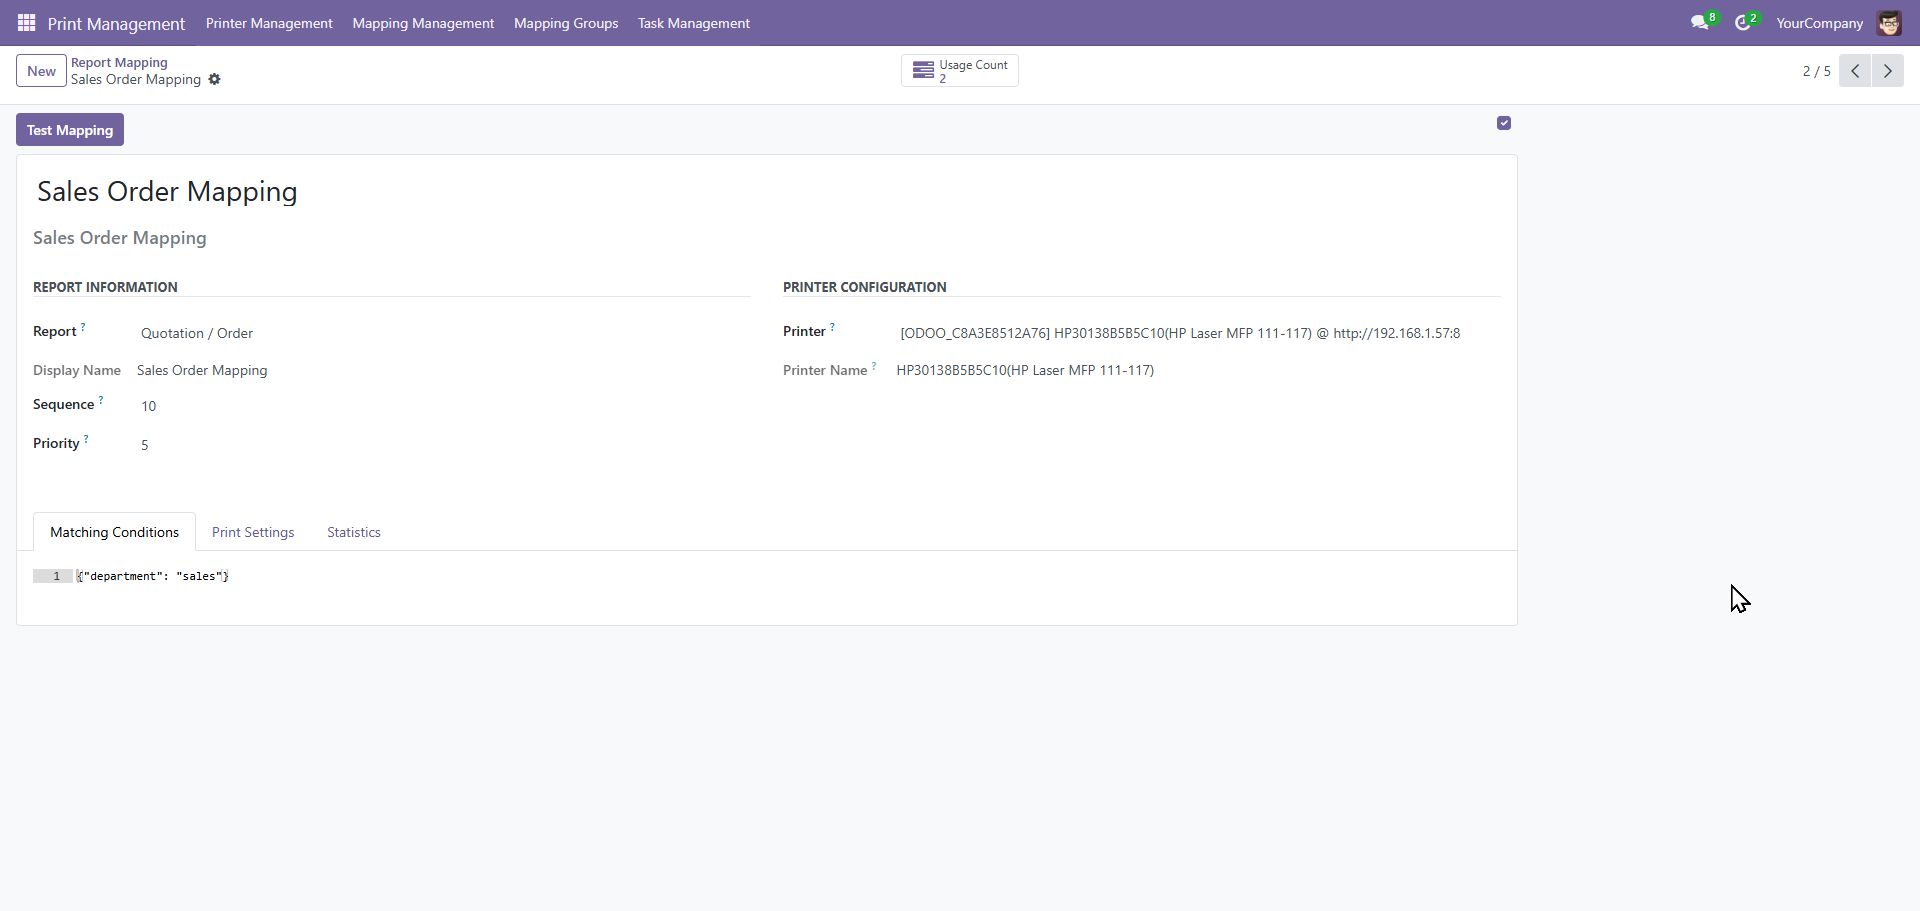
绑定完成以后,在打印时就会直接打印到相应的打印机
如果存在多个绑定时,会弹出对话框让用户选择具体的打印机
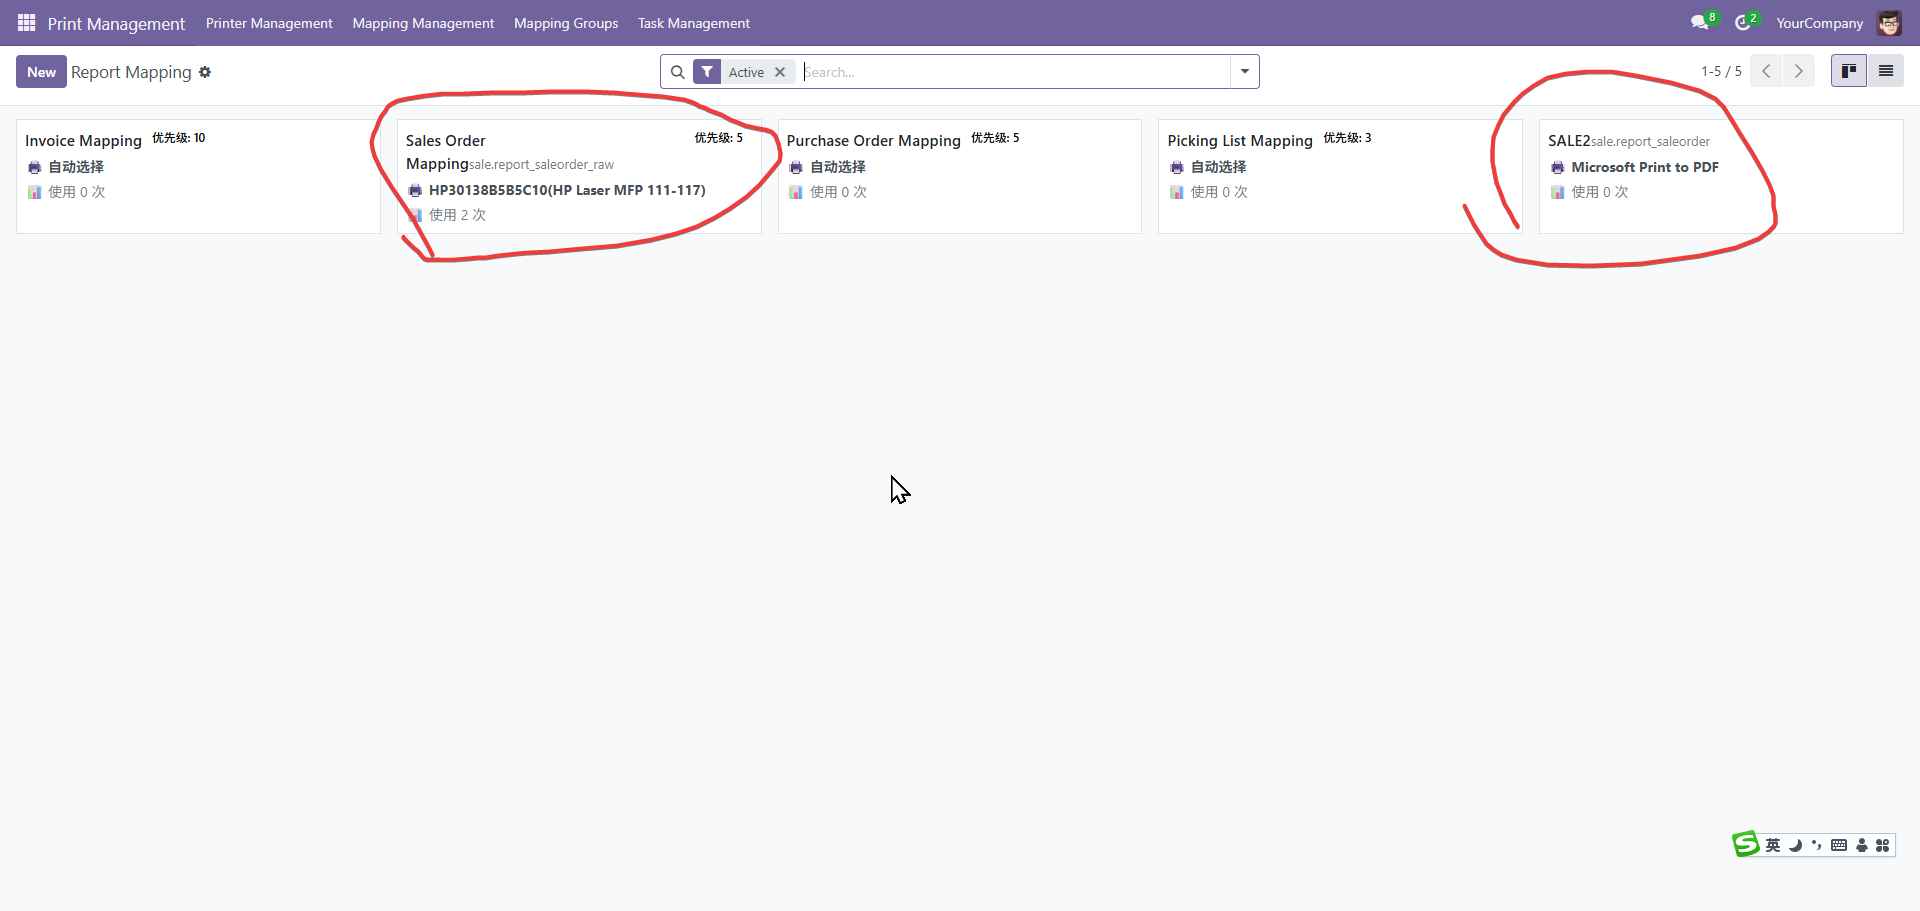
如图,两个绑定,打印时
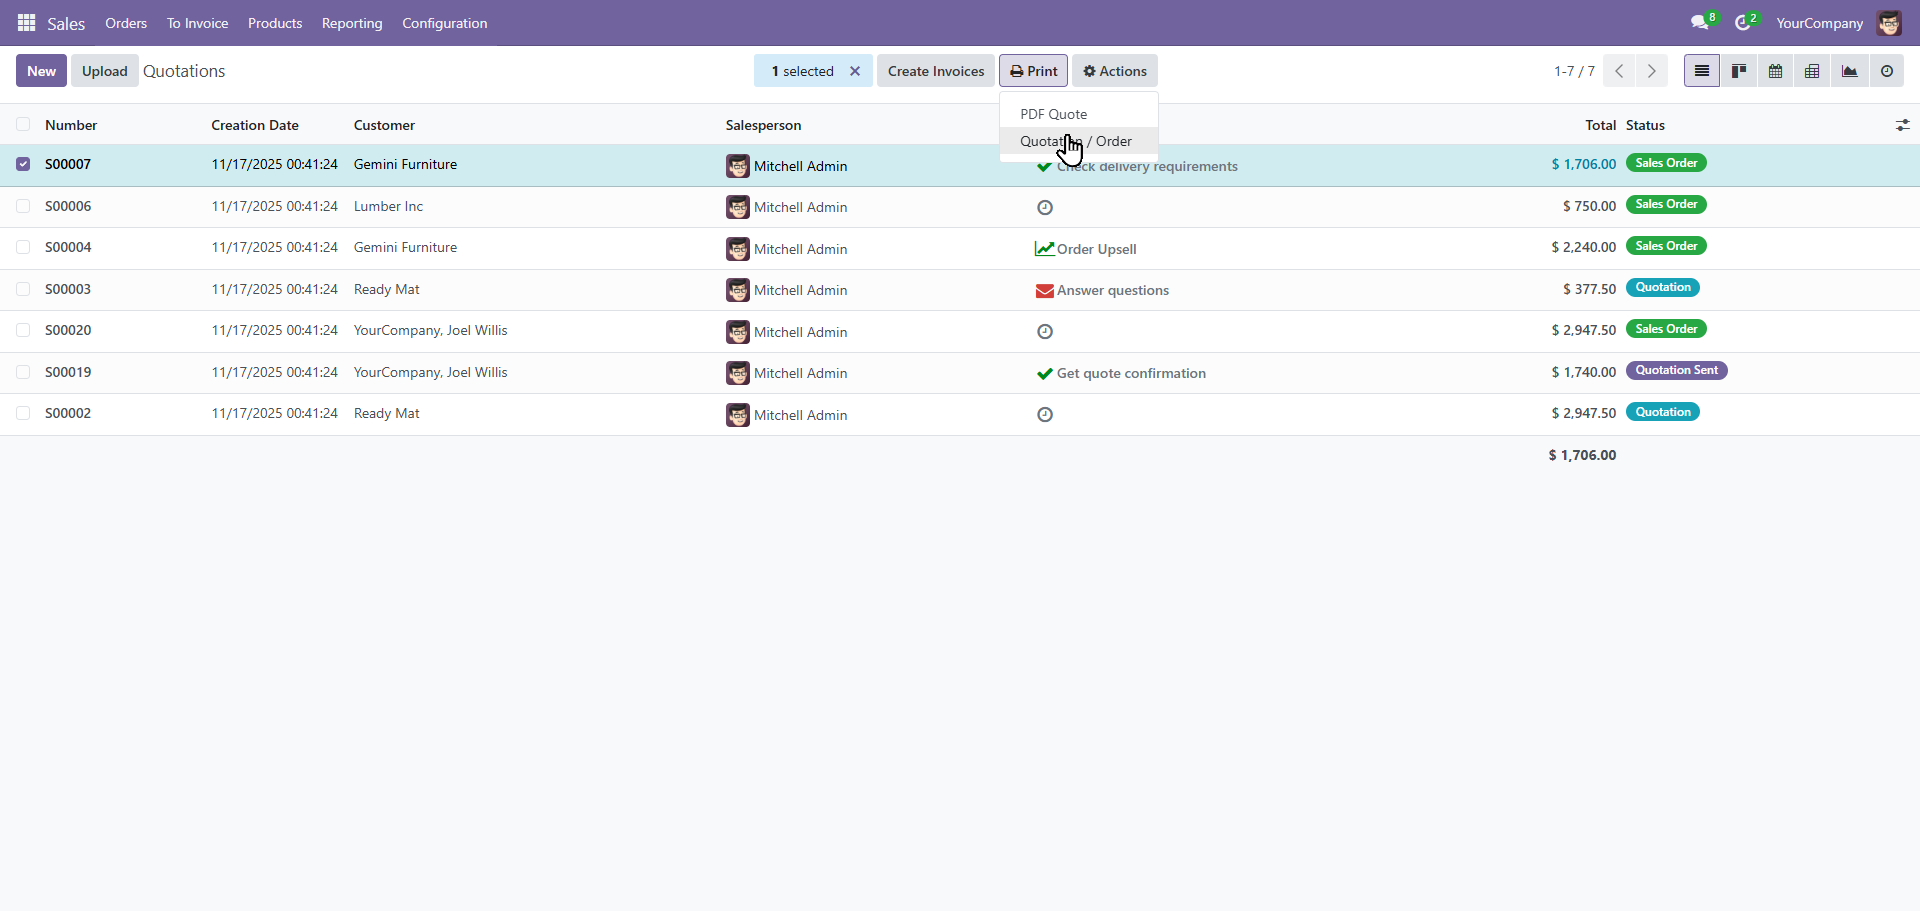
此时弹出对话框让用户选择
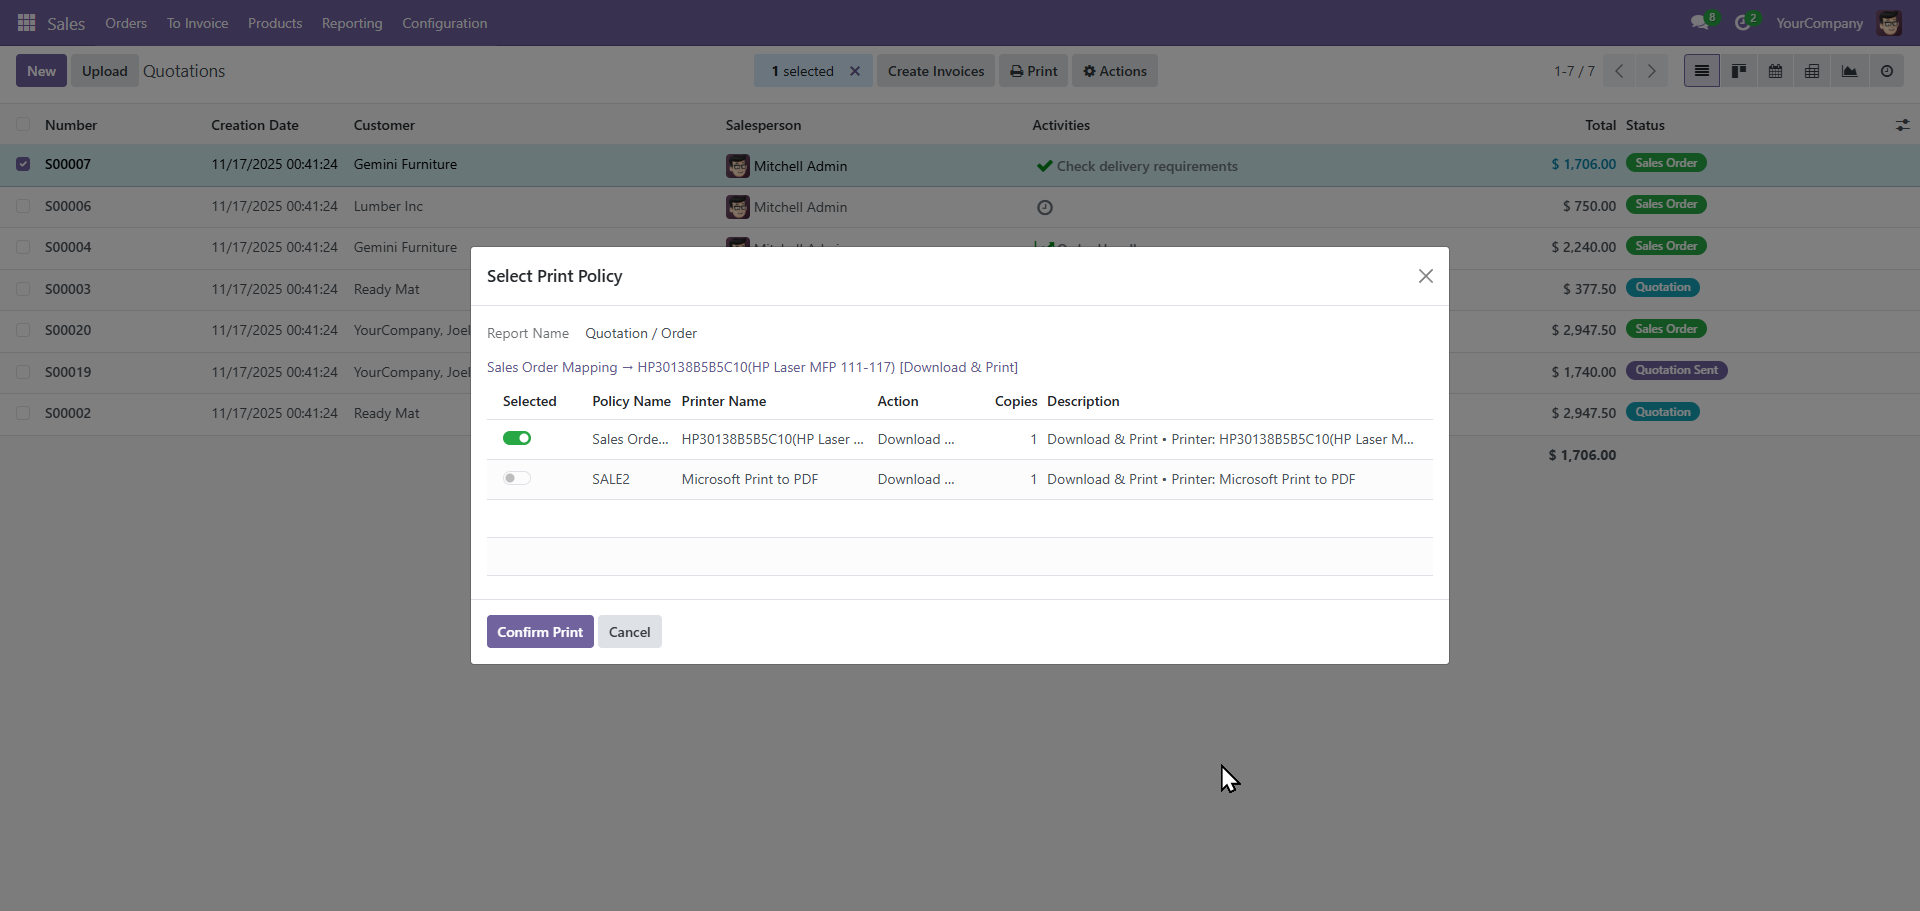
点击toggle按扭进行切换。
下载地址:
通过网盘分享的文件:源力ODOO远程打印
链接: https://pan.baidu.com/s/1n0ZRpknPbIjOJXmZfq_x_g?pwd=r8up 提取码: r8up
进群加微信